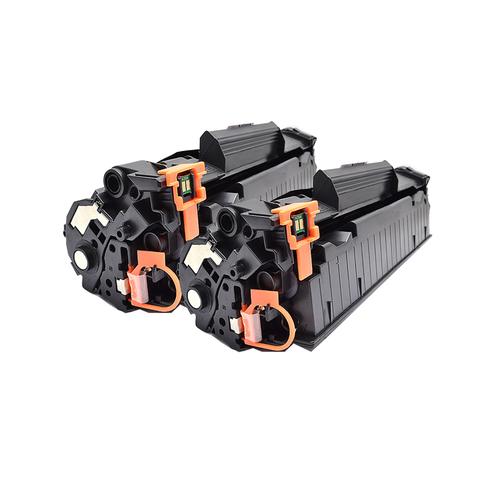
How to Install TN830XL Toner: A Step-by-Step Guide
Installing a new toner cartridge is a task that many printer owners face at some point. Whether you’re a seasoned pro or a first-time user, the process can sometimes seem daunting. But fear not! This comprehensive guide will walk you through the installation of the TN830XL toner, ensuring that your printer is up and running in no time. Let’s dive in!
Before You Begin
Before you start the installation process, it’s essential to gather a few items and ensure that you have a clean, well-lit workspace. Here’s what you’ll need:
- Replacement TN830XL toner cartridge
- Scissors or a knife
- Soft, lint-free cloth
- Optional: gloves to protect your hands
Make sure to unplug your printer before beginning the installation to avoid any electrical hazards.
Step 1: Open the Printer
Locate the toner cartridge access door on the front or top of your printer. Depending on the model, it may be a simple slide or a twist-and-lift mechanism. Once the door is open, you’ll see the toner cartridge drawer inside.
Step 2: Remove the Old Toner Cartridge
Grasp the old toner cartridge by the handle or sides and gently pull it out of the drawer. Be cautious not to touch the imaging drum, as oils from your fingers can affect print quality.
Once the old cartridge is out, use scissors or a knife to carefully cut the orange tape that secures the toner cartridge. Be sure to dispose of the tape in a proper waste bin.
Step 3: Remove the New Toner Cartridge from the Packaging
Remove the new TN830XL toner cartridge from its packaging. Be gentle when removing the protective cover, as it may contain static electricity that could damage the cartridge.
Step 4: Install the New Toner Cartridge
Align the new toner cartridge with the guides inside the drawer. Gently slide it into the drawer until it clicks into place. Make sure it is seated securely.
Step 5: Close the Toner Cartridge Drawer and Access Door
Once the new toner cartridge is installed, close the toner cartridge drawer and access door. If your printer has an LCD screen, it may prompt you to select “OK” or “Toner Cartridge Installed” to confirm the new cartridge.
Step 6: Power On the Printer and Align the Cartridge
Plug in your printer and turn it on. Follow the on-screen instructions to align the new toner cartridge. This process may vary depending on your printer model, but it typically involves printing an alignment page and then following the prompts to align the cartridge.
Step 7: Test Your Printer
After the alignment process is complete, print a test page to ensure that the new TN830XL toner cartridge is working correctly. If the print quality is satisfactory, you’re all set!
Additional Tips
Here are a few additional tips to help you maintain your TN830XL toner cartridge and printer:
- Keep your printer in a clean, dust-free environment.
- Regularly clean the printer’s paper tray and roller to prevent paper jams.
- Replace the toner cartridge before it runs out to avoid print quality issues.
- Follow the manufacturer’s recommended maintenance schedule for your printer.
By following these steps and tips, you’ll be able to install your TN830XL toner cartridge with ease and enjoy high-quality prints from your printer for years to come.